Documentation
Connect to Cloudflare (Legacy)
The following documentation refers to functionality in use by older projects on our platform.
Adding CloudFlare to your project allows you to benefit from their free DDoS protection and optimisation services. It also allows Servd to manage DNS records for your project directly, so you don't have to.
Connecting a CloudFlare Account #
-
Create or Log In to your CloudFlare account over at cloudflare.com
-
Visit the My Profile > API Tokens page and click Create Token. Select the Custom token type to start with an empty token configuration.
-
Give your API token a name. Something like 'Servd - mywebsite.com' would be good!
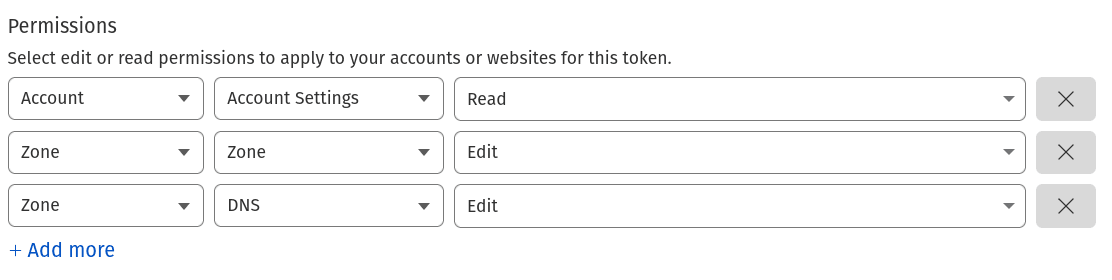
In the Permissions section, we need to add the following permissions to allow Servd to find your CloudFlare zones and make changes to them:- Account > Account Settings > Read
- Zone > Zone > Edit
- Zone > DNS > Edit
Once complete, it should look a little something like this:
In the Account Resources and Zone Resources sections you can lock the token down to a specific account and zone if you wish. This will ensure Servd can only read/write to those specific resources, however it isn't strictly necessary.
Leave the Client IP Filtering section blank and click Continue To Summary then Create Token
-
Copy your new API token - this is the last time CloudFlare will show it to you so keep it safe.
-
Head back over to the Servd Dashboard and visit the Project Settings > Domains page.
-
In the CloudFlare panel, enter the API token you generated earlier.
-
If your API token has access to multiple CloudFlare accounts - we'll ask you which one you'd like to use. Choose the one that you'd like to contain the domains that your Servd project will be using.
-
Your project is now connected to the CloudFlare account and is ready to add a domain.
Every project on Servd is connected to a single CloudFlare account, but you can connect multiple Servd projects to a single CloudFlare account. If you share a single CloudFlare account between multiple Servd projects all of the domains associated with those projects will be created within that one account.
Connecting a project to an existing CloudFlare account will not remove or edit any of the existing contents of that account. If you connect a domain which already exists within your CloudFlare account, Servd will find and use that existing domain and all of its settings rather than try to create a new one.
Adding a Domain to your CloudFlare Account #
Once connected to your CloudFlare account you need to link up the domains that you've added to your Servd project, with Zones in the CloudFlare account.Luckily, that's super easy:
-
Visit the Project Settings > Domains page in the Servd Dashboard
-
If you have not yet added the domain or subdomain to the Domains panel at the top of the page, do so now.
-
Find the domain in the CloudFlare panel and click 'Connect to CloudFlare'
-
The domain has now been created in your CloudFlare account and linked to your Servd project.
If the domain already existed with another domain registrar, your DNS records will be copied over automatically.
If the domain didn't already exist within your CloudFlare account, it will also contain some initial DNS records required to send traffic to the Servd platform.
Update Your Nameservers To Point To CloudFlare #
As well as connecting your Servd project to CloudFlare, you also need to configure your domain name to use CloudFlare as its authoritative source for DNS records. You can do this by updating your domain's nameservers to point to the nameservers shown in the Servd dashboard for your domain.
You can find instructions for this in your Domain Registrar's documentation.
Once complete, CloudFlare will detect the change and generate valid SSL certificates for you automatically. Incoming traffic will also begin flowing through CloudFlare if you have CloudFlare proxying enabled.
Edit DNS Records #
Once a project is connected to CloudFlare you can edit most of its DNS records directly within the Servd dashboard. These changes are synced with CloudFlare and take effect immediately.
Update DNS Records For Servd #
If your CloudFlare DNS records become out of sync with Servd, or you add some additional subdomains to your Servd project which you would like to create DNS records for, simply click the 'Update DNS for Servd' button in the DNS section of the CloudFlare panel. This will ensure that all domains which have been added in the Domains panel have appropriate DNS records created within the CloudFlare account.